Netgear EAX18 Setup | Nighthawk AC1750 Setup
Want to boost your existing wireless network and access the internet from literally every corner of your house? Performing Netgear Nighthawk AX1750 EAX18 setup might just be the perfect option for you.
You can extend your existing wireless network in three ways:
- By pressing the WPS button.
- By accessing the mywifiext.net web page.
- By using the Netgear Nighthawk app.
Netgear Nighthawk EAX18 Setup | AX1750
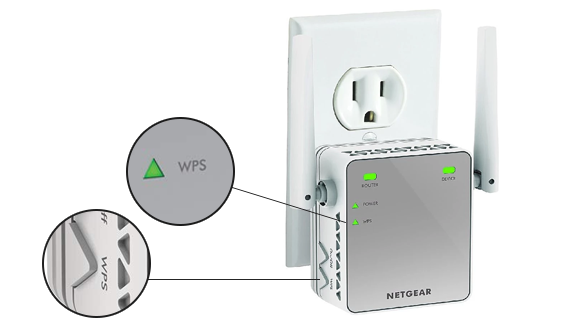
WPS Method
Steps to setup Netgear Nighthawk AX1750 EAX18 using the WPS method:
- Power on your Nighthawk EAX18 WiFi range extender.
- Wait for the power LED light to become solid green.
- Connect the Netgear extender to the existing modem.
- Look for the WPS button at the bottom of EAX18 extender.
- Once found, press the button carefully.
- Shift your Netgear extender to a new location.
- Now, connect your computer or laptop to the extender network.
Netgear Nighthawk EAX18 Manual Setup
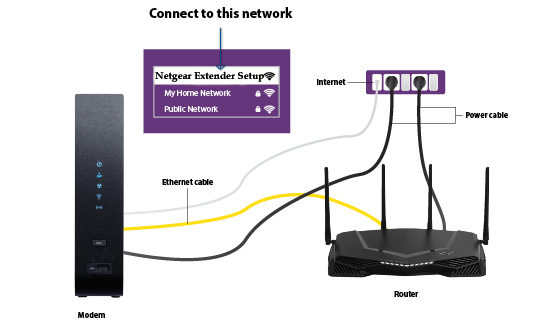
Manual Method
Step-by-step guidelines to set up Netgear Nighthawk AX1750 EAX18 manually:
- Switch on your Netgear AX1750 EAX18 WiFi extender.
- Plug your WiFi device into a wall socket.
- Do not proceed further until and unless the power LED becomes solid green.
- Connect the extender to the router with a cable.
- Launch a browser on your computer or laptop and go to the mywifiext web page.
- The Netgear extender login will appear on your screen.
- Fill in the default admin credentials in the given fields and hit Enter.
- Follow the steps on the Basic Home screen to connect to the existing WiFi network.
If you get stuck at any point while setting up a Netgear Nighthawk AX1750 EAX18 extender, then don’t hesitate to get in touch with our team of experts at Toll-Free: .
Netgear Nighthawk AX1750 EAX18 Setup
Using Netgear Nighthawk App
If you want to set up Netgear AX1750 EAX18 WiFi mesh extender with your mobile device, then downloading the Nighthawk app just might be the option for you. You can download the Netgear Nighthawk application both on Android and Apple devices.
Here are the steps that you need to follow to set up EAX18 range extender by using the Netgear Nighthawk app:
- Make sure that your Netgear EAX18 extender is connected to the router.
- Unlock your mobile device and download the Netgear Nighthawk app.
- Open the Netgear Nighthawk application and create a Netgear account.
- Follow the on-screen instructions and connect youre extender to the internet.
Facing issues in setting up a Netgear Nighthawk AX1750 EAX18 WiFi range extender? Worry not. Simply contact our knowledgeable and skilled technicians. They’ll surely assist you in setting up your WiFi extender from the comfort of your home.
Netgear Nighthawk EAX18 Setup | AX1750
Common Setup Issues
Netgear Nighthawk AX1750 EAX18 Setup
Troubleshooting Steps to Fix Setup Issues
Walk through the below-mentioned troubleshooting tips and get rid of the AX1750 EAX18 extender setup issues:
- Ensure that your Netgear Nighthawk AX1750 EAX18 is receiving enough power supply from the wall socket.
- The power cable that you are using to connect your EAX18 extender to the wall socket shouldn’t be loose or worn out.
- Your extender should have an access to a blazing-fast internet connection.
- Keep your EAX18 WiFi range extender far away from fish tanks, washing machines, microwave ovens, refrigerators, corners, thick concrete walls, and much more.
- Make sure that you have entered the right web address in the address bar of your preferred internet browser.
- Use the latest version of your web browser while logging into your WiFi extender.
- Restore your AX1750 EAX18 extender to its factory default settings.
The aforementioned mentioned tips will surely help in troubleshooting the EAX18 setup issues. On the off-chance, if they don’t, then either update the firmware of your WiFi device or get in touch with our experts immediately
Nighthawk AX1750 EAX18 Firmware Update
Mentioned below are the instructions that you need to follow in order to update your EAX18 extender to its latest firmware version:
- Power on your Netgear Nighthawk AX1750 EAX18 extender.
- Log into your WiFi range extender by accessing mywifiext.net.
- Go to the Settings option located at the top-right corner.
- Click on the Netgear Extender Firmware Update button.
- If any firmware updates are available, click on the Yes option.
- Now, wait for a couple of seconds for your EAX18 WiFi extender to get updated.