Know more about Netgear Nighthawk Extender Setup – (AC1900) EX7000
Netgear Nighthawk extender setup (AC1900) EX7000 boosts your existing wireless network range and delivers dual-band uninterrupted WiFi speeds up to 1900 Mbps. As a matter of fact, Nighthawk combines an excellent and outstanding range with maximum and continuous WiFi performance.
Without any issue, it works easily with any standard WiFi router. It is ideal for HD video streaming and online gaming as well. So, with this smart Netgear WiFi extender, get the whole-home WiFi connectivity you need for tablets, iPhones, smartphones, laptops, computers, and more.
Install Your Netgear Nighthawk AC1900
The most common and easy way to use the Netgear Nighthawk AC1900 extender setup is to perk up the range of your existing home WiFi network. You can also make use of the Netgear WiFi extender as an access point to create a new WiFi hotspot using an Ethernet connection.
Step-1: Set up the Netgear extender’s hardware
To set up your extender’s hardware:
- Attach the rubber feet or the stand.
- After that, attach the antennas as well.
- Turn on your range extender.
- Place your extender close to your Netgear WiFi router. If you have a WiFi router other than that of Netgear, then you can also use it because this smart Nighthawk extender is compatible with any WiFi router.
- Plug your Netgear Nighthawk device into a power outlet. Push the Power button (if necessary). As soon as you do this, the Device to Extender – Link Rate LED lights amber and Netgear LED lights white and turn off automatically.
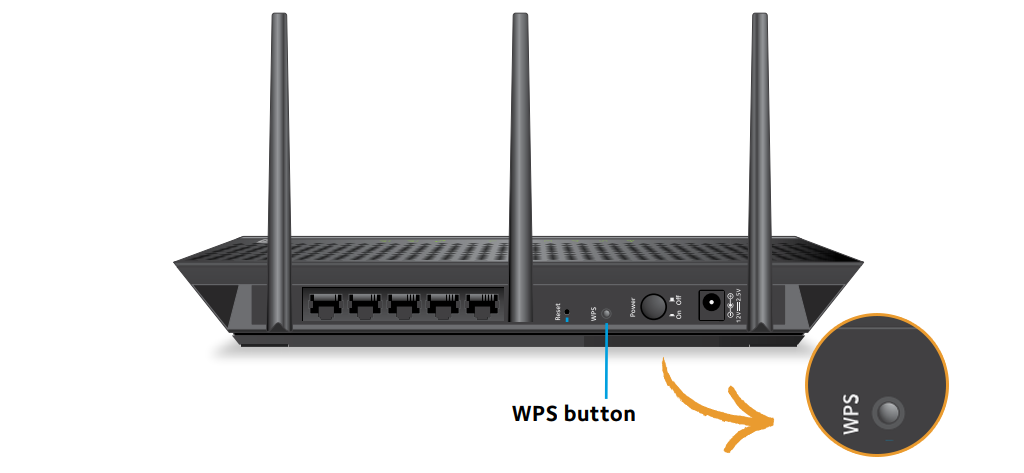
Step-2: Use the WPS Button
You can use the WPS method to connect your Netgear extender to your existing router without typing the router’s SSID (network name) or WiFi password.
To use the WPS method:
- Make sure your range extender is properly powered on.
- Press the WPS button on your Nighthawk extender.
- Device to Extender LED and the Link Rate LEDs both will blink green.
- On your WiFi router, press the WPS button.
- If your router supports the 5 GHz band, repeat the 1st and the 2nd step and connect your range extender to the 5 GHz band.
- Unplug your Nighthawk extender and place it to a new location where you want.
- Plug your Netgear Nighthawk extender into a power outlet.
- It is also recommended to use the Link Rate LED that will help you choose a spot where the extender-to-router connection is best.
- If your router’s Link LED does not light green or amber, plug your range extender into an outlet that is closer or in reach of your WiFi router.
To prevent any issues related to the Netgear Nighthawk extender setup – (AC1900) EX7000 process, ensure that the firmware on your extender and router is up-to-date.
Step-3: Log in to Your Extender
Use an appropriate/suitable web browser to log in to your extender and set up its internet connection to your main WiFi router:
- Connect a laptop or computer to the extender using a wired or WiFi connection.
On a computer, laptop, tablet, or a smartphone, load up the WiFi connection manager and connect to your range extender’s WiFi network Netgear_Ext. Once you are successfully connected to your WiFi extender, the Device to Extender LED will become solid green.
- Head towards your internet browser.
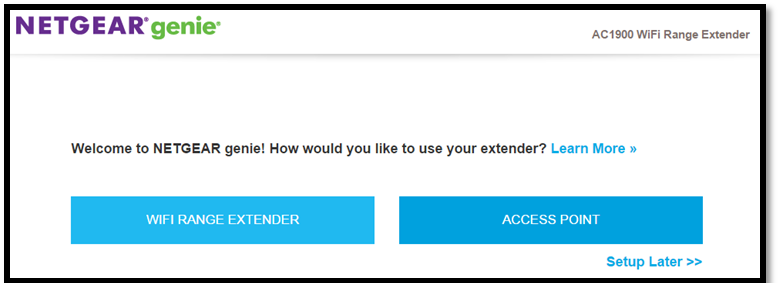
- When the first time that you log in to your range extender, the Netgear Genie setup page will display.
- If the web page doesn’t display the setup page, open another internet browser and enter www.mywifiext.net web address into the field of the browser’s address bar.
- Follow the on-screen prompts to connect your Nighthawk extender to your main WiFi network.
- Once you are done with the setup and installation process of your Netgear device successfully, unplug your Nighthawk device and place it to a new location.
Step-4: Set up Your Extender
As a matter of fact, you can cable your smart WiFi range extender to your existing WiFi router and after that, set up your Netgear device i.e. the extender in an access point mode to create a new powerful WiFi hotspot.
To use the range extender in AP (access point) mode:
- Grab an Ethernet cable to connect your main router to the Netgear extender.
- Then, plug your extender into an electrical outlet and after that, power it on.
- Connect to the Netgear_Ext (SSID) WiFi network using a WiFi network manager on your laptop or desktop.
Note: In the access point (AP) mode, you can easily connect your computer or laptop to the extender using a WiFi connection only.
- Load an internet browser.
- Type the IP address of your extender (default) into the address bar.
- Then, simply follow the on-screen prompts and connect your range extender to your existing WiFi network.
If you have any queries related to the Netgear Nighthawk setup, simply contact our technical experts and get rid of the issues instantly you are facing.
Tags: Netgear extender setup, nighthawk ac1900 setup